


Elden Ring has managed to garner great reviews from all major publications. The game stands out for its extensive gameplay, fleshed-out mechanics, and more importantly massive enemies. Elden Ring has a progression system that allows you to upgrade your weapons using Smithing Stones.
These stones come at different levels granting different leveled upgrades. Smithing Stone 3 is one such stone that will be needed to upgrade your weapons, and if you are on the hunt for the same, then here’s all you need to know about it.
Where to get Smithing Stone 3 in Elden Ring
You will find Smithing Stones scattered throughout various locations in Elden Ring. Some of these stones can be purchased while others can be looted. There are certain locations and enemies as well that are known to drop smithing stones once defeated.
You can use such enemies to your advantage to farm smithing stones in Elden Ring. Here are all the currently known locations of Smithing Stone 3 in Elden Ring.
Purchasable Smithing Stone 3 Locations
The first kind is the purchasable Smithing Stone 3 in Elden Ring. This requires you to exchange Bell Bearing and runes in exchange for smithing stone.
While it might seem like an expensive exchange at first, you will soon make your money back once you realize that you can buy unlimited smithing stones. Here’s all you need to know about it.
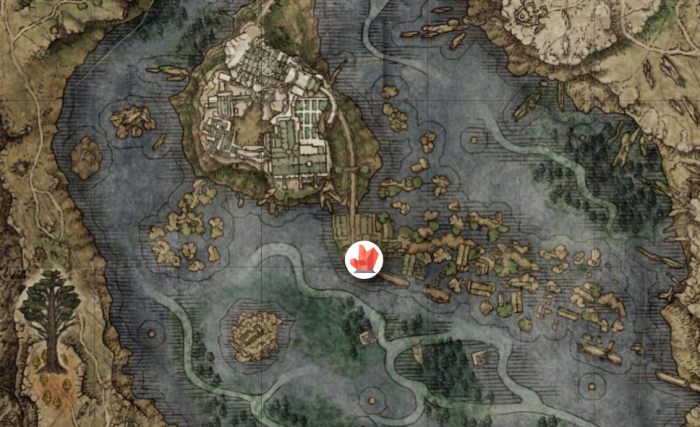
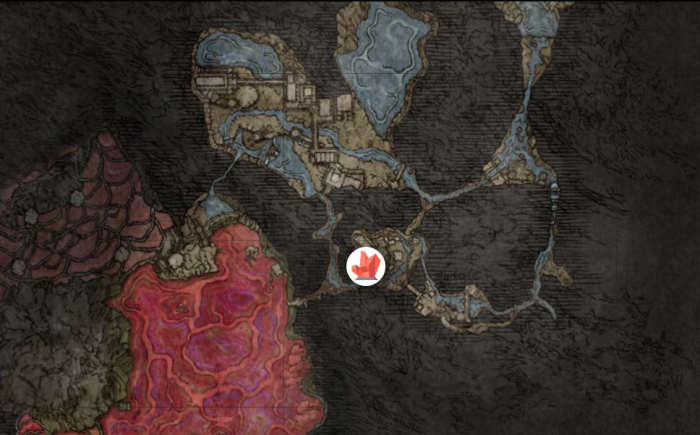
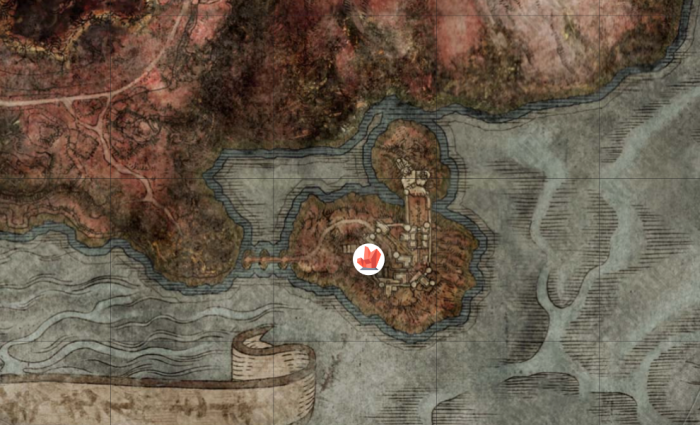
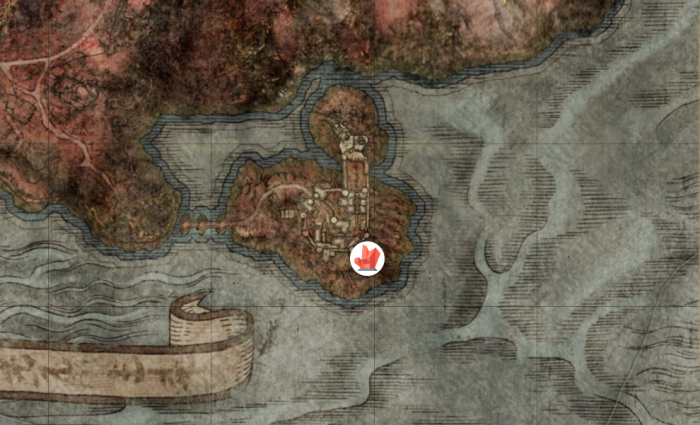
Location 1
- Area name: Twin Maiden Husks
- Details: You can exchange runes in exchange for a Smithing Stone 3 at this location.
- Price: 600 Runes
- Additional Requirements: You will also need to offer them Smithing Stone Miner’s Bell Bearing (2).
- How to get Reach the location with at least 600 runes and the Stone Miner’s Ball Bearing. Once at the Roundtable Hold, exchange the same for a Smithing Stone 3.
Drop Locations for Smithing Stone 3
Drop Locations are locations where you will always find Smithing Stone 3 once the world or NPC has regenerated itself.
These locations can come in handy if you’re looking to upgrade faster while farming your Smithing Stone 3. Here are the known drop locations for Smithing Stone 3 in Elden Ring so far.
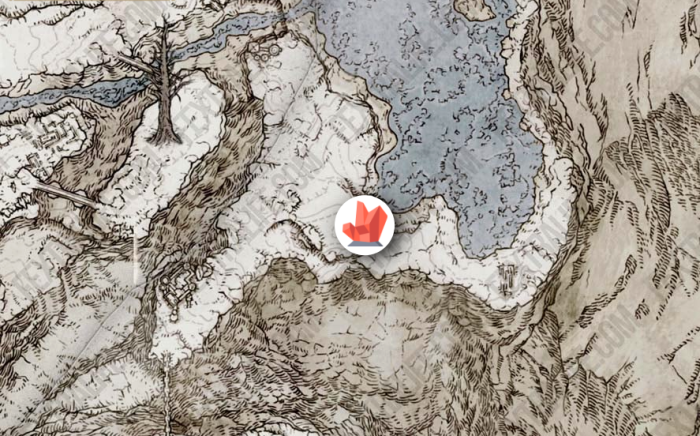
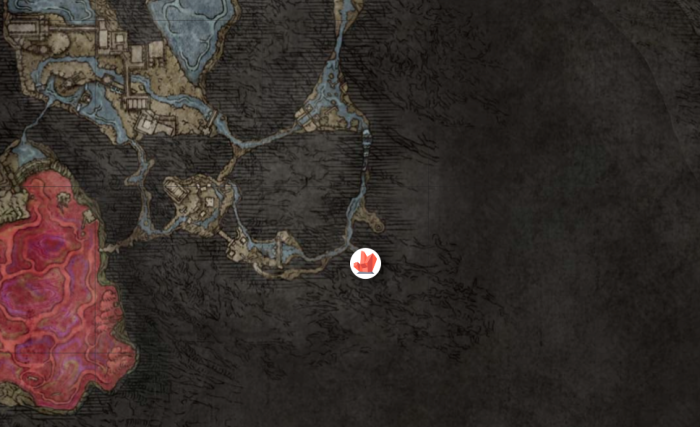
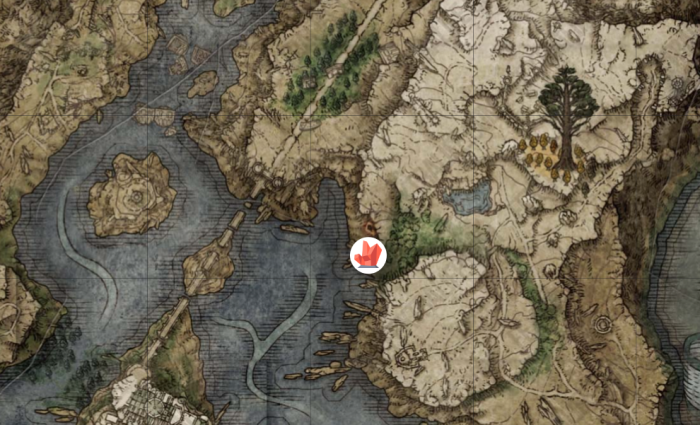
Location 1
- Area name: Near Bellum Church Site of Grace
- Details: There are two miners at a campsite near this site of grace that drops Smithing Stone 2 and 3 when attacked.
- Additional Requirements: Recommended to carry a strike weapon
- How to get: Reach the site of grace and ride out of the church, past the ramp as well as the merchant. You will now find a campsite down the road with two miners. Deal Strike Damage to these miners and they should drop some Smithing Stones for you.
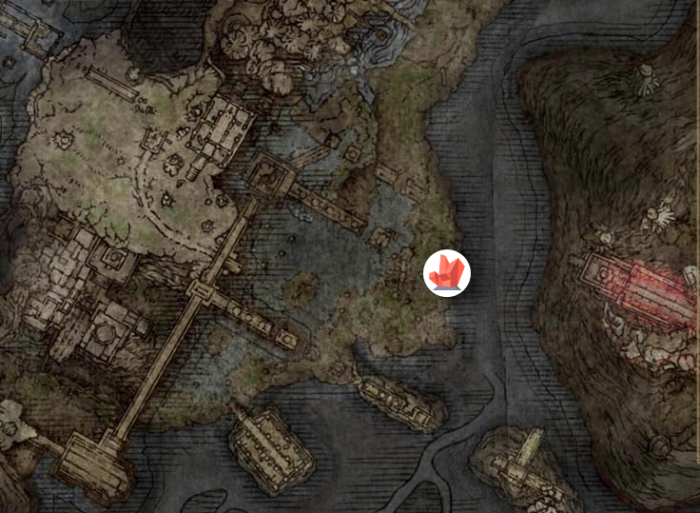
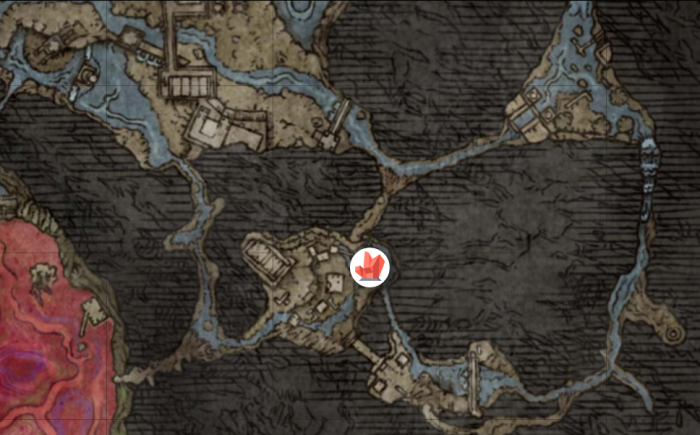
Location 2
- Area name: South Raya Lucaria Gate’s site of grace
- Details: Raya Lucaria soldiers guarding the farm in this area drop Smithing Stone 2 and 3.
- Additional Requirements: None
- How to get: Reach the site of grace and make your way towards the soldiers. Attack and take them all down for Smithing Stone 3 drops. We recommend you start with isolated soldiers across the farm and take them down one by one for a better chance at Smithing Stone drops.
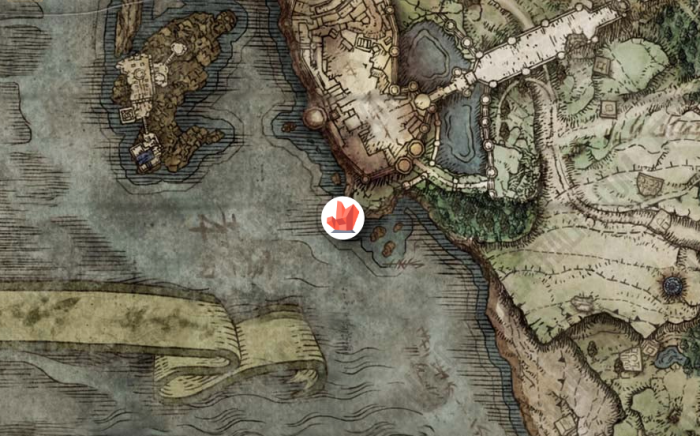
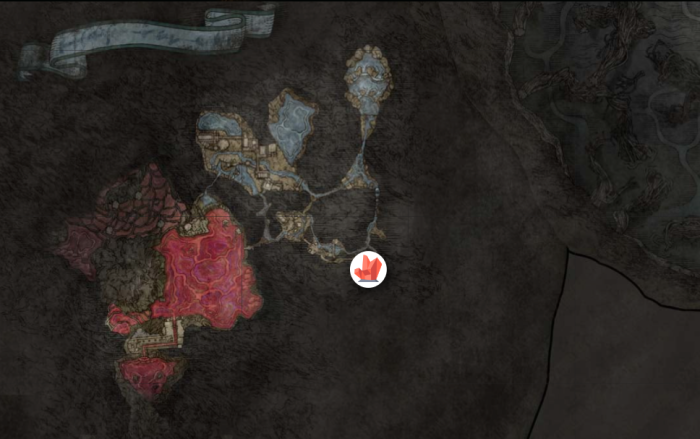
Location 3
- Area name: Impassable Greatbridge site of grace
- Details: Radahn Soldiers and Giant Dogs roam this area. Both are known to drop Smithing Stones once taken down.
- Additional Requirements: Higher skills or strike damage to survive the fight.
- How to get: Make your way to the site of grace and take on the Radahn Soldiers and Giant Dogs. The recommended way of doing so is by triggering a fight between them. You can then pick off the soldiers one by one from a distance if you can deal enough damage or wait for the fight to finish.
Location 4
- Area name: Gael Tunnel
- Details: Gael Tunnel is a daunting area with a lot of enemies. However, all miners in this area drop Smithing Stone 3, and all soldiers in this area drop Smithing Stone 4.
Warning: If this is your first time entering the Gael Tunnel, please keep in mind that you will be trapped in this location until you reach the site of grace at the end of this tunnel. Thankfully the Boss in this area is optional so you can easily bypass him.
- Additional Requirements: None
- How to get: Enter the Gael tunnel and explore its area as usual. Make your way to the end and make sure to take down any miners you find along the way. Most should drop Smithing Stone 3 for you.
Loot locations for Smithing Stone 3
Smithing Stone 3 has also been scattered around the world of Elden Ring so that you can have a chance at upgrading your existing weapons. Follow the locations below to find all Smithing Stone 3 locations discovered in Elden Ring to date.
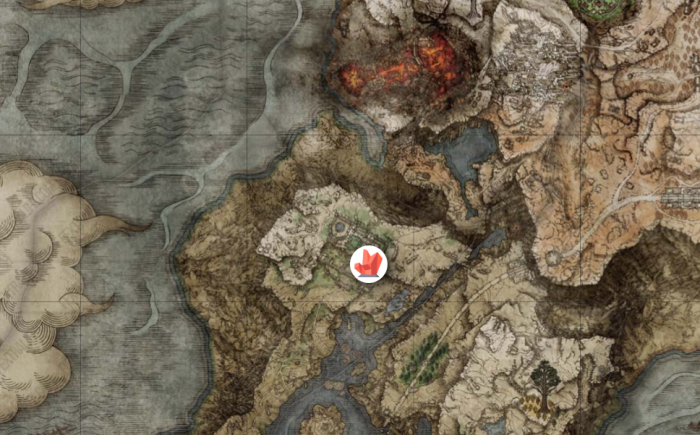
Location 1
- Area name: Stormveil Castle
- Details: This Smithing Stone 3 can be found on a corpse in the area.
- Additional Requirements: None
- How to get: Move towards the southwestern cliffs and you should be able to spot Bladed Talon Eagles from a distance. A corpse in this area will have the Smithing Stone 3.
Location 2
- Area name: Liurnia of the Lakes
- Details: This Smithing Stone is near the Laskyar Ruins
- Additional Requirements: None
- How to get: You can get this Smithing Stone 3 by looking for a corpse resting outside a gazebo. If you seem lost then look for the Laskyar Ruins first and then the gazebo with a corpse.
Location 3

- Area name: Liurnia of the Lakes
- Details: Another Smithing Stone 3 that can be found on a corpse, this time you need to look for a corpse on a chair sitting in the middle of flower enemies.
- Additional Requirements: None
- How to get: Reach Liurnia of Lakes and move towards the northeast of the site of grace. This is named Academy Gate Town’s site of grace. You will find a corpse sitting on a chair amidst flower enemies, loot the same to obtain your Smithing Stone.
Location 4
- Area name: Liurnia of the Lakes
- Details: This is hard to get smithing stone hidden on a corpse that is protected by Raya Lucaria Soldiers.
- Additional Requirements: None
- How to get: You will need to move up the road leading from the Academy Gate Town and look for a Flame Chariot. It will have several Raya Lucaria Soldiers beside it. Look for a corpse in this area and loot the same to obtain your Smithing Stone 3.
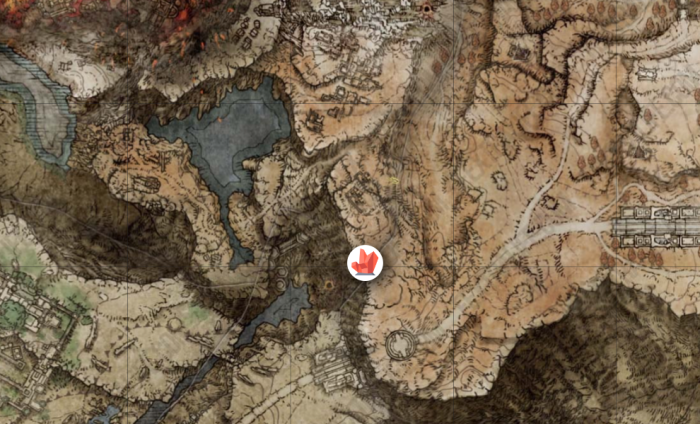
Location 5
- Area name: Ainsel River caves
- Details: This stone is located at the end of the Ainsel River caves.
- Additional Requirements: None
- How to get: Focusing on exploration, this stone can be easily found once you reach the dead-end of Ainsel River caves. Simply loot and obtain the Smithing Stone 3 to add it to your inventory.
Location 6
- Area name: Ainsel River
- Details: This is another stone located on a corpse that can be a bit hard to find. Follow the instructions below to help you along with the process.
- Additional Requirements: None
- How to get: Look for giant ants or a mountain of bodies in this area. Both are co-related and if you find the Giant Ants, follow them to find the giant pile of corpses. You will find Smithing Stone 4 on one of these corpses.
Location 7

- Area name: Ainsel River
- Details: This Smithing Stone 3 is fairly easy to find and is one of the first things you should ideally come across when in the Ainsel River area.
- Additional Requirements: None
- How to get: Simply look for a steady ramp leading up to the Ainsel River. There will be a corpse at the bottom of this ramp which can be looted for a Smithing Stone 3 in Elden Ring.
Location 8
- Area name: Ainsel River
- Details: There are another two Smithing Stone 3 located in the Ainsel River area near the giant column structures. Make your way towards the same to get your stones.
- Additional Requirements: None
- How to get: Look for giant column structures in the Ainsel River area. You should be able to find two of them, one intact and the other one tipped over. You will need to use the tipped-over column to climb the standing column structure. This structure will have a corpse lying atop the edge. Looting this corpse will grant you two Smithing Stone 3.
Location 9
- Area name: Ainsel River
- Details: There are another 3 Smithing Stone 3 in the Ainsel River area that can be found near the map piece for the area.
- Additional Requirements: None
- How to get: These stones are a bit hard to get and will require you to explore the area a bit. Look for a large stone building in the area that should contain a map piece for the Ainsel River area. Once you’ve found this building, walk behind it to find a corpse housing three Smithing Stone 3 that can be easily looted.
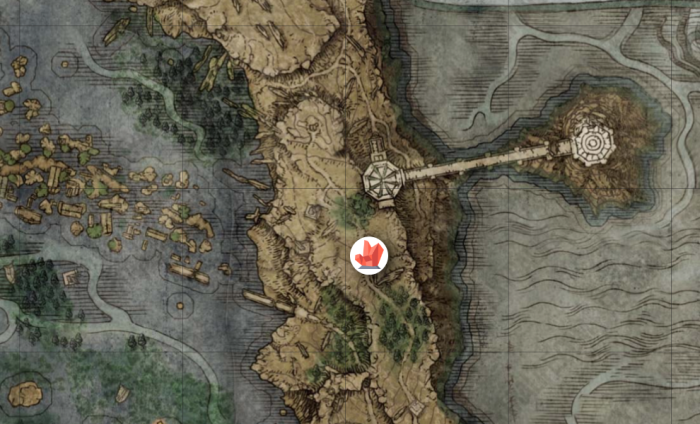
Location 10
- Area name: Caria Manor
- Details: This stone can be found in the graveyard area of the Caria Manor.
- Additional Requirements: None
- How to get: Make your way to the Caria Manor and look for the graveyard. The graveyard should be located on a cliffside. You should be able to spot a Smithing Stone 3 easily once you reach this area.
Location 11

- Area name: Nokron, Eternal City
- Details: This is another smithing stone 3 located on a corpse in the Nokron area of the Eternal City.
- Additional Requirements: None
- How to get: Look for the large body of water in the area and then make your way across its ledge. You should find a corpse about to fall in, in this area. Loot the same to find your next Smithing Stone 3.
Location 12
- Area name: Ruin Strewn Precipice
- Details: You will find many smithing stones in this area. Most require you to enter the caves and make your way through them.
- Additional Requirements: None
- How to get: The first one can be found in the second part of the caves when you’re making your way through them. You will find a random corpse in the area holding your smithing stone.
Location 13
- Area name: Ruin Strewn Precipice
- Details: The second stone is also located on a corpse but will be found on the roof of the ruins.
- Additional Requirements: None
- How to get: Make your way through the caves and you will soon come across the Giant Land Octopus on the roof. Once defeated, you will find a corpse on the roof holding your next smithing stone.
Location 14
- Area name: Ruin Strewn Precipice
- Details: This stone is located further down the caves when you come across the singing-winged old lady.
- Additional Requirements: None
- How to get: When making your way through the caves you will come across 2 singing-winged old ladies. When you reach the second old lady, look for a tent on your right. You will find your smithing stone hidden under this tent.
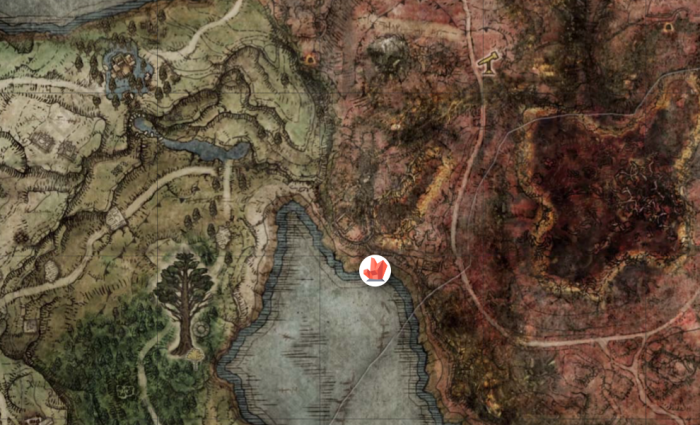
Location 15
- Area name: Liurnia of the Lakes
- Details: This smithing stone is fairly easy to find and is located in the gravesite where you fight Tibia Mariner.
- Additional Requirements: None
- How to get: Simply fight Tibia Mariner to unlock and scavenge the area easily or hide and make your way to the gravesite. You should be able to find the smithing stone in this location easily.
Location 16
- Area name: Night’s Sacred Ground
- Details: This Smithing Stone 3 is found in a locked Room in this area.
- Additional Requirements: None
- How to get: Reach the intended location and look for an imp statue in the Night’s Sacred Ground. Once found, look behind the same to discover a locked door. You will find your Smithing Stone 3 in this locked room.
Location 17

- Area name: Raya Lucaria Academy
- Details: Another Smithing Stone 3 in the Raya Lucaria Academy, this one is found on the rooftops of the Academy.
- Additional Requirements: None
- How to get: Make your way to the rooftops of the Academy and make your way towards the East. You will find a corpse in this area that should be holding a Smithing Stone 3.
Location 18
- Area name: Raya Lucaria Crystal Tunnel
- Details: This is a massive tunnel with tons of stages. A total of eight Smithing Stone 3 can be found in this area.
- Additional Requirements: None
- How to get: Make your way through the dungeon while defeating all enemies. Smithing Stones should be pretty easy to locate as you make your way through the dungeon.
Location 19
- Area name: Redmane Castle
- Details: The Castle has a total of two Smithing Stone 3 that can be looted. The first one can be found on the ground level.
- Additional Requirements: None
- How to get: Once you reach the castle, look for the lookout tower. It should be a big tower on the outside of the castle. There is a corpse behind this tower and looting the same will help you find your fist Smithing Stone 3 in this area.
Location 20
- Area name: Redmane Castle
- Details: The second stone can be found atop the castle on the rooftops.
- Additional Requirements: None
- How to get: Reach the castle and make your way to the rooftops. Once atop the castle, move towards the southeast section of the castle and look for a corpse. Once found, loot the corpse and you will be granted your 2nd Smithing Stone 3 for the area.
And that’s it! These were all the currently known locations of Smithing Stone 3 in Elden Ring. If you find any new locations, feel free to share them with us in the comments section below.